
All tutorials on this site are copyright protected. They are part of a book that I am currently working on and will publish in the near future.
In order to keep our tutorials simple for this web site, we have kept the verbiage to a minimum There is a lot left up to the viewer to discover. We hope you enjoy these and find them useful.
Kaiser Glass Design
Screen Printing with Kaiser’s ProScreen™
ProScreen™ is an easy and non-
You will need:
- ProScreen ™ Screening material from Kaiser Glass Designs
- A UV fluorescent lamp (available at Home Depot, Lowes or Walmart)any length is fine
- Clear glass about 4x4 inches. Another 4x4 piece of opaque glass (Black is good)
- Pump Sprayer (about $10 in the garden area) available at Lowes, Home Depot or Lowes.
- Small flat bowl of water
- Hair dryer
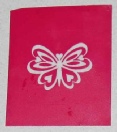
Negative (a transparency printed in black is perfect). Note: the transparency needs to be VERY dark.
Keep in mind that the ProScreen™ material is light sensitive. It will not develop immediately, but do not dawdle while working with it. Also keep the light low in the room and do not expose it to sunlight.
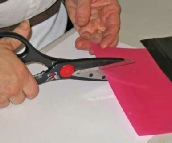 Cut a piece of ProScreen™ a little larger than the negative you want to reproduce.
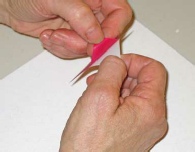
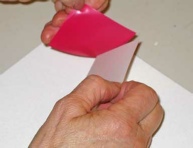
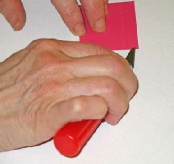
Remove the matte plastic protective surface from the screen. This is the hardest part of the process. Once learned it is easy, but it can be frustrating at first. Pick at the corner of the screen side with a craft razor until it releases from the protective plastic. At that point rip the plastic off. Do not pull it off slowly....it may stick in places if you do.
Lay the ProScreen™ material on the colored backing glass with the smooth (emulsion) side up. Center the negative on top of the screen. Put the clean clear glass on top. This holds the negative and screen in place for the exposure.
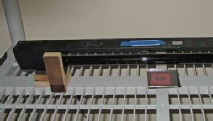
Place this “sandwich” under the UV lamp about 2 inches from lamp to glass. Turn the lamp on and expose the screen for 3.5 minutes then turn off the lamp.
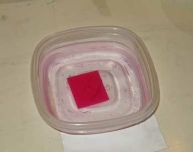
Take your “sandwich” apart and place the ProScreen™ in the small bowl of water with the smooth (emulsion) side up. Be sure the bowl is in an area that is not in bright light. The emulsion is still sensitive.
Fill the sprayer with water and pump it up.
Let the screen rest in the water for 1 minute.
You should spray in a sink or in a bucket to keep over spray from making a mess. Remove the screen from the water and place it on the palm of your hand emulsion side up, From a distance of about 12 inches, spray the screen. The unexposed emulsion should be removed in this process. Check the screen carefully and spray further if all the unexposed emulsion is not removed. Be careful not to be too rough with the screen.
At this point you no longer have to worry about light. Dry the screen well with the hairdryer.
Place the ProScreen™ back under the UV light for a minimum of 10 minutes. This final exposure is just to harden of the emulsion.
You now have a screen that can be used over and over.
If you wish to learn some exciting and unique ways to use the ProScreen™, take our Images on Glass course. It teaches some amazing techniques.


| Silver metal and glass clay samples |