
All tutorials on this site are copyright protected. They are part of a book that I am currently working on and will publish in the near future.
In order to keep our tutorials simple for this web site, we have kept the verbiage to a minimum There is a lot left up to the viewer to discover. We hope you enjoy these and find them useful.
Using Easy Masking to
Enhance your work
Masking made easy
One of the processes we use quite effectively in our glass is masking and painting. While we have highly detailed methods of masking, there is one low tech method that is very effective and the results are quite beautiful. We use masking or electrical tape on glass. While this is obvious once we say it, we have found it used in very little around the glass community. It should be used a lot more!!
What you will need for this process is:
- Masking tape,
- Glass Paints (we use our own premixed Kaiser Glass Paints-
They work great) - Palette knife or paint brush
- Craft knife
- A cab that is fired and ground to size
Framing a Cab
 First of all, a “cab” is a term borrowed from lapidary. In this case it means a piece
that has been fired (usually tack fused) and shaped.. Since it is tack fused, it
will be flat on top and the sides are vertical once it has been ground down.
First of all, a “cab” is a term borrowed from lapidary. In this case it means a piece
that has been fired (usually tack fused) and shaped.. Since it is tack fused, it
will be flat on top and the sides are vertical once it has been ground down.
We now cover the entire top with masking tape. Then turn the piece over and run a razor (craft knife) around the outline of the piece. Remove the cut away masking tape. Turn it back over and you should now have a piece that has tape over the entire top.
Carefully run the blade around the cab, cutting the tape about 1/16 inch in from the edge. This can be done by hand fairly accurately. Remove the outside tape that has been sliced. You should now have a piece with tape covering the entire top os the cab except a little “frame” around the outside.
Now for the painting! We use the Kaiser Paints because we have them (obviously) and because they cover very well and are thick. Using a brush or a palette knife, paint the top (frame area) and the sides of the cab. It is not necessary to be accurate on the top, as that is why the tape is there. Do not use an excess of paint. Just cover the open areas. Too much paint will potentially bubble and also tends to run.
Carefully peel the tape away while the paint is still wet. This can be tricky. We have found that we hold the piece down in the center of the taped area with a pencil eraser, it is easy to peel the tape. You move the easer to an exposed area to get the tape off of where you were holding it. Once done, dry the pain If you dry the paint before removing the tape, it cracks and flakes.. We use a hot air gun, but you can do so under a hot lamp. Once dried, paint that has gone where you do not want it can be carefully scraped away with a craft knife. Areas that need more paint can be touched up. Also, the bottom, which will have some paint on it (take my word), can be cleaned with a damp cloth.
The piece can now be fused. We usually use a temperature half way between tack and full fuse. This gives a nice rounding of the edges without disturbing the design on the top or in the cab.
Your completed piece will have a nice frame around your design.
Flaming a Cab
Put a piece of tape on a cutting surface. We use a laminated sheet, but lots of things
work very well. Cut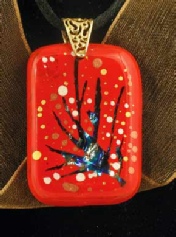 strips, curves, and shapes into the tape. Peel the small cut
pieces off the cutting surface and apply to the surface of a glass cab (see above).
These can be applied in any manner you desire.
strips, curves, and shapes into the tape. Peel the small cut
pieces off the cutting surface and apply to the surface of a glass cab (see above).
These can be applied in any manner you desire.
Now paint the entire surface and the sides of the cab. Carefully remove the tape while the paint is still wet. Dry and fuse as above.
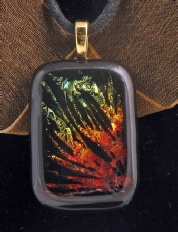
The first ones of these we did, we \cut a series of thin slices and placed them in a random radiating pattern from one of the corners. The underlying cab was a piece of bright dichroic glass. The end product looked like a flame....thus the name.
Additional easy masking
This is just a start of the simple masking that can be done on a glass cab. You can also buy stickers at a craft store such as Michael. Use these just as you would the masking tape. You can obviously find hearts, stars and circles. in addition, you can find some designs that are not standard. We found a wedding sheet that had intricate patterns that were quite beautiful.
You are now ready to let your imagination work for you. These techniques are low tech, but the results can be quite beautiful.
| Silver metal and glass clay samples |