
All tutorials on this site are copyright protected. They are part of a book that I am currently working on and will publish in the near future.
In order to keep our tutorials simple for this web site, we have kept the verbiage to a minimum There is a lot left up to the viewer to discover. We hope you enjoy these and find them useful.
Kaiser Glass Design
High Temperature Fusing Of Dichroic Glass

This is a series of fun projects to do fusing dichroic glass at very high temperatures.
Conventional wisdom has it that you cannot fuse dichroic glass over 1550°F or the
coating will burn off. This has not been our experience. In fact there are some properties
of the coating that come into play at elevated (1700-
There has also been discussion of change of COE at elevated temperatures. While this may be true, I have not experienced this in any way with the processes that I discuss here.
Let me first say that some silver dichroic does tend to loose its color at this temperature. It just goes somewhat fuzzy white. This limitation is one that can be avoided by not using the color, or just using a little so it doesn’t dominate.
There are two properties of the dichroic coating that we will take advantage of at elevated temperatures. The first is that dichroic coatings do not mix with one another. They actually seem to repel one another. You probably have experience putting two pieces of dichro together face to face and have them separate after fusing. This is because the coatings act as a separator to the other coating. The dichro will fuse to glass. That is why people etch some areas of the coating when they need to fuse dichro to dichro. The etched areas adhere across the barrier.
The second property is that the dichroic coating flows on top of the hot glass. The hotter the glass, the more the tendency to flow. This means that when the glass is very hot, the coating is almost free floating on the glass and actually can break up and move around. You can think of this like a drop of oil on the surface of water. It can break up into smaller portions if the water is disturbed.
Now to have a little fun.
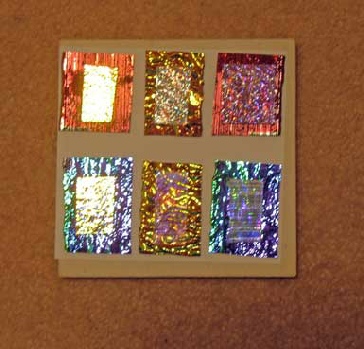
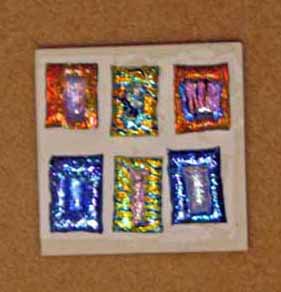
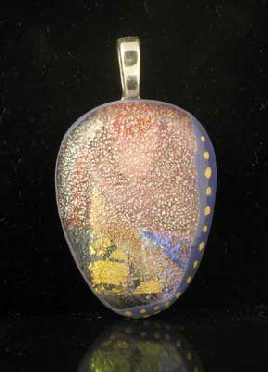
Pinfire Dichroic Glass

Take 6 to 8 pieces of 1 inch by 2 inch thin clear dichroic glass in different colors You may use longer and/or more pieces. Stack them facing the same direction. Dam them as you would make a pattern bar (which you are). Fuse these into the pattern bar (you may tack fuse or full fuse, it does not matter). When you fuse these, be sure they are vertical to allow the air to escape.
Fuse schedule:
0-
1050-
1250-
Crash and anneal your favorite way, I suggest
To 960 afap/20
Natural cool the kiln
Once these have been fused into a bar and cooled, we will fuse them a second time. Place the pattern bar standing on end. Now fuse it by the following schedule)
0-
1250-
Crash and anneal your favorite way.
This high temperature fuse breaks up the dichroic coating in a somewhat random way. The surface of the resulting piece will not be smooth. We will take care of this in the next step.
The resulting “blob” may now be treated as a piece of dichroic glass for fusing sake. You may take one of 2 paths now.
1) cut up the blob and full fuse with a cap (and with a base if you wish) resulting in a finished piece. I sometimes fuse it with a colored base giving it a unique look. Adding more glass as a cap and base causes the dichro to break up more(which actually is good). The cap gives it a clear and shiny top. Remember to give this a good bubble squeeze.
Suggested schedule:
0-
1050-
1250-
Crash to 960 and anneal as you wish
2) Create another “blob” by fusing the entire blob with a clear cap and optionally a base.
Suggested schedule
0-
1050-
1250-
Crash to 960 and anneal as you wish
This piece can be cut into individual pendants and full fused again.
In both of these cases be sure to clean the edges well when preparing the final fusing. I have not had a problem with devitrification, but I clean my pieces well and use a devit preventative (spray A. Clearcoat, etc)on the edges.
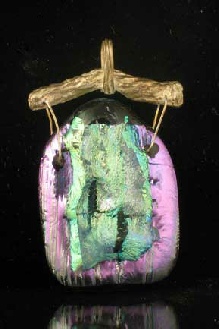
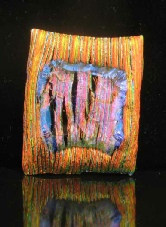
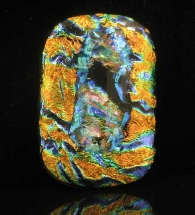
Creating a window
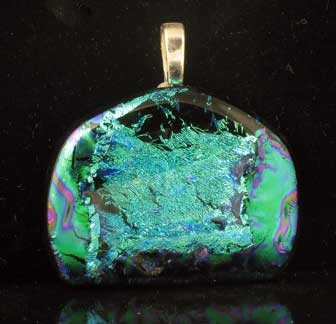
This one is too easy. Take a piece of black dichroic glass, preferably a textured piece (ripple, reed etc). Any size will do, but lets use 1.5 inch square. Place it on a kiln shelf. On top of this, place a second piece of dichroic 1 inch square centered on the above piece. This second piece can be textured or not. It needs to be 1/2 smaller than the base piece leaving ¼ inch around uncovered on the outside of the bottom piece. Place it such that the dichroic coatings are FACING each other. Yes, this is just what everyone tells you not to do. We will fuse this. Note the glass WILL stick together after it is fused. Take my word for it.
Suggested schedule:
0-
1050-
1250-
Where the two coatings are touching, an interesting thing happens. They will repel one another and the top coating will tend to migrate toward the surface around the outside of its glass backing.
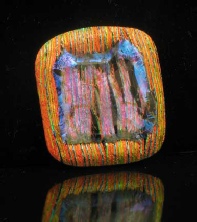
After Fusing Cold Worked and Refused
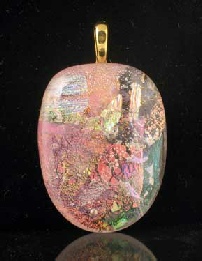
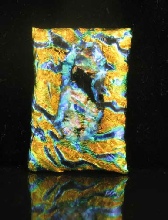
Fusing Dichroic Glass Cutoffs and Scrap.
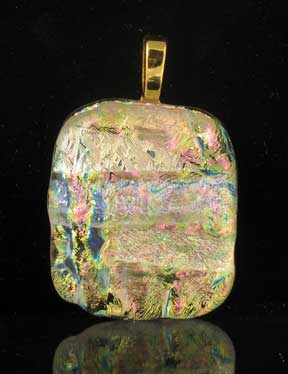
I use this process to use up the excess clear dichroic glass cutoffs that I accumulate. Unfortunately it only works for clear for obvious reasons. You can use your black backed as a base.
For this project it is best to use small pieces. You should not have any pieces that would dominate the look of the piece. I have lots of those curved cutoffs from CBS sheets. I put them in a plastic bag and hammer them. Don’t overdo it. You don’t want all frit. As long as the pieces are broken up you can use them.
Place a 3x3 sheet of glass on your kiln shelf. I usually use clear. Since this is the base, you could use a color, but I find that I can add color later in the processing.You can do this without a base sheet, but I find the added glass helps dilute the dichro which I like. On top of this piece pile the dichroic clear pieces. You now have two choices.
1) Mound as much dichroic scraps as you want on the 3x3. This can be fused and used later as if it were a dichroic piece. For example, you can cut the resulting piece into pendant sized pieces and sandwich the that between a base and a cap.
2) Put about 1/2-
Whichever method you want to use fuse as follows.
0-
1050-
1250-
Crash and anneal
Once again, the reason for the high temperature is to encourage the dichroic coating to migrate and split up. This process gives a very sparkly look.
Have fun. You can play with these procedures all your little heart desires. Lots of different permutations..
| Silver metal and glass clay samples |