
All tutorials on this site are copyright protected. They are part of a book that I am currently working on and will publish in the near future.
In order to keep our tutorials simple for this web site, we have kept the verbiage to a minimum There is a lot left up to the viewer to discover. We hope you enjoy these and find them useful.
Kaiser Glass Design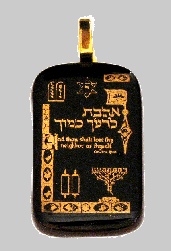
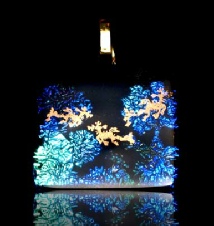
Gold on Glass
Gold has always been one of the standards of beauty. Bright, shiny and luscious, it adds perceived value to any piece. It is also quite difficult to add it to a glass piece with control and detail.
Gold is also quite expensive. The layers of gold we use are quite thin. This keeps
the cost of the gold in our pieces quite low. In fact adding gold, even in fairly
large areas is quite reasonable. Typical cost of adding gold to any pendant will
be luch less than a dollar.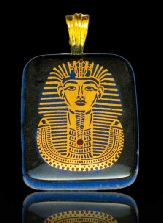
The easiest way is to add gold is as a decal. That greatly limits the design to available commercial decals. There are several companies that have decals, but the selection is still quite limited.
One can also use a Kemper Pen (or similar device) and liquid gold lustre. This is an effective way of adding gold to glass. The drawback is that the artist must paint directly on the glass and errors are difficult correct.
Our objective in developing our method was to let the artist create a design that can be accurately be transferred onto the glass in gold. Below is a description of this method.
Caveats
1) The gold must be on the surface of the glass. This method should not be capped. The reason for that is that the gold layer is very thin. Any capping will move the glass enough to disperse the gold to some degree, ruining the design element.
2) We attempt to limit the number of firings of the gold, preferrably to two firings.
3)Limit the etching time (see below) to less than 10 seconds if possible.
Process overview
Applying the gold
The gold is applied to the surface of the glass in one of two methods. The first and preferred method is to apply a solid gold decal. Strips of solid gold are available from several suppliers. We prefer the 5/8 inch wide strips from Harbon. These are the widest strips we have found. They are 30 inches long so the other direction is not a problem. We apply three parallel strips to the glass with a vey slight overlap.Once applied, the gold is fused onto the glass by heating to 1350°F for 5 minutes.
The second method of applying the gold is to use the liquid gold lustre available from Duncan, Thompson, or Colorobbia. The liquid is painted on the glass. The drawback is that it is difficult to achieve an even coat. If the coat is uneven, the gold color will vary. Again, once the gold has been applied it is fused at 1350°F for 5 minutes.
Creating the design in the gold.
The property of the gold on the glass that enables us to design, that the gold on the surface will etch with etching creme. In fact, we find that the gold etches so easily that we try to limit our etching time.
Now we come to the critical part of the process. We now mask the gold where we want it to remain. In other words, we are protecting the gold surface in selected areas. The etching material removes the gold in areas that are not masked.
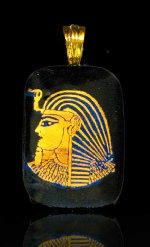
Our preferred method is a process we developed for use on glass....Photopolymer Masking. This is a photographic process that transfers a hand drawn or computer design to the glass as a mask. We will not discuss this process here, but we do teach a course about it. All of the samples on this page are created with the PPM process.
There are three other ways to mask the glass:
1) An adhesive solid. This is a fancy way of saying a tape of some sort. This can be masking tape, electrical tape, stickers (like from Michaels), or frisket (airbrush masking material). You can cut the tape into the design you want. Then stick to the glass.
2) Liquid masking material You can use Rubber cement, Elmers glue, Weld-
3) SOME marker pens. We have not done an exhaustive search of the available markers. But, many markers do not work. Just because the marker says permanent does not mean it will work. Regular permanent Sharpies will not work. The etching cream etches through the regular Sharpie pretty rapidly. Having said that, our favorite for this process is Sharpie PAINT marker in red (available at Michaels, AC Moore or any craft store) with an extra fine point. Also Michaels has a house brand paint marker called craftsmart which works well.
It is pretty easy to test the marker on a piece of glass that is coated with gold or use a piece of unfired dichro. Just etch and see of the marker protects the dichro or gold.
Once the glass has been masked, simply etch it for 5 to 10 seconds and then wash off the cream. ....Voila your design remains.
Using the gold in a design
The gold can be added to a piece that has already been created. We do this often. The coating gold is added in areas that we want our design. This can mean painting (gold lustre) in one small area of the piece, or coating the entire piece. We fire on the gold and then mask and etch.
Our preferred method for a large design (in our world, that is about 1.5x2 inches) is to coat a piece of clear glass with gold decal. Proceed with the fire, mask, etch process.
I want to repeat that the etching process is very fast. It is even possible to etch quick enough not to matte the glass, thus eliminating the necessity of fire polishing.
| Silver metal and glass clay samples |