
All tutorials on this site are copyright protected. They are part of a book that I am currently working on and will publish in the near future.
In order to keep our tutorials simple for this web site, we have kept the verbiage to a minimum There is a lot left up to the viewer to discover. We hope you enjoy these and find them useful.
Crackle in a Minute!
Introduction
Recently crackle design on glass has become quite popular. The originator of the frit based crackle, Bob Leatherbarrow, does quite beautiful work. We recently created another method of making pieces exhibiting the beautiful crackle design. Some of that work can be seen on our web site (www.kaiserglasss.com) on in the Kaiser Glass You Tube on (what else) crackle glass.
 Sometimes however, a fuser has just got ot have fun! Recently we were working with
some samples of Wissmach textured glass. The technique that we were trying to develop
did not work. But in looking at the results of our “failure”, something popped out
at us. In following that concept we came up with what we call “crackle in a minute”.
This technique is not meant to replace our crackle technique, nor the frit based
technique. Both of those are far more flexible and result in better definition of
the crackle element. But it is fun, easy and very inexpensive. None of those three
are bad!
Sometimes however, a fuser has just got ot have fun! Recently we were working with
some samples of Wissmach textured glass. The technique that we were trying to develop
did not work. But in looking at the results of our “failure”, something popped out
at us. In following that concept we came up with what we call “crackle in a minute”.
This technique is not meant to replace our crackle technique, nor the frit based
technique. Both of those are far more flexible and result in better definition of
the crackle element. But it is fun, easy and very inexpensive. None of those three
are bad!
Start with the Glass
Editing information
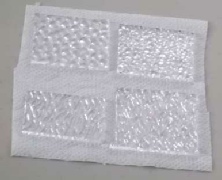
 For our purpose we use Wissmach clear textured COE90 glass. The glass is 2mm thick
and works great for this use. In addition Wissmach has many different textures. This
yields an abundance of looks to the crackle glass. Wissmach make 12 of these designs
in clear. We have tried hammered, dewdrop, stream-
For our purpose we use Wissmach clear textured COE90 glass. The glass is 2mm thick
and works great for this use. In addition Wissmach has many different textures. This
yields an abundance of looks to the crackle glass. Wissmach make 12 of these designs
in clear. We have tried hammered, dewdrop, stream-
Since we work only small, we cut the glass into 2 inch squares.
Add Paint
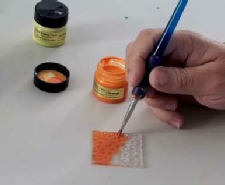
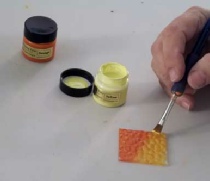 At this point we use our Kaiser Glass Paints. Since it is thick and dries very slowly,
it works great here. We paint the textured side of the glass, covering the entire
surface. In the example here, we use more than one color. That works perfectly well.
At this point we use our Kaiser Glass Paints. Since it is thick and dries very slowly,
it works great here. We paint the textured side of the glass, covering the entire
surface. In the example here, we use more than one color. That works perfectly well.
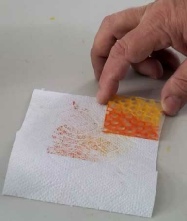
Now comes the hard work
Prepare yourself, because we are about to enter the difficult part of this operation Turn the glass over on a clean paper towel and rub in a circle for about three seconds. Whew..that was really hard.
The towel rub removes the paint from the high points in the texture yielding a crackle look. At this point, dry the paint either in a toaster oven at 350 for 5 minutes, or with a hot air gun.
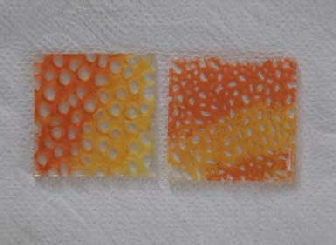
 At this point you can cool the glass and add more detail if you wish. You can add
slight extra contrasting colors at various points on the glass. Just use you artistic
nature to enhance the piece. Or you can just leave it as it is (as we usually do).
At this point you can cool the glass and add more detail if you wish. You can add
slight extra contrasting colors at various points on the glass. Just use you artistic
nature to enhance the piece. Or you can just leave it as it is (as we usually do).
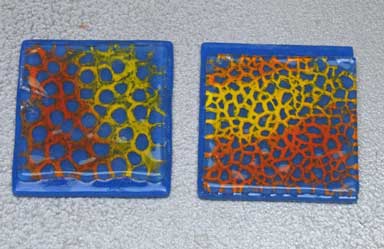
Fusing
We now use the crackle piece as a cap on a colored base. In these examples we use cobalt blue. You can use the crackle cap either texture up or texture down. Make sure you use a good bubble squeeze as you fuse the piece. We give suggested schedules in our “Jewelry Fusing Made Easy” tutorial on our web site.
At this point you shape your piece and then fire polish.
Crackle in sixty seconds
While the entire process including drying and fusing takes longer than a minute, The creative part can go that fast. Best of all, the results are quite interesting and can be a jumping off place for much more creativity. An example of this is that you can paint the backing glass several colors, and/or add mica to it.
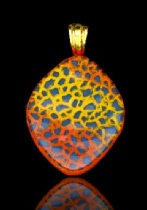
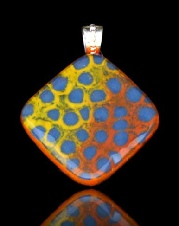
Pieces at top of page are the ones here cleaned up for pendants
| Silver metal and glass clay samples |